> ## Documentation Index
> Fetch the complete documentation index at: https://docs.gooseworks.ai/llms.txt
> Use this file to discover all available pages before exploring further.
# ChatGPT (web)
> Connect GooseWorks to ChatGPT on the web as a custom MCP connector over OAuth
Connect GooseWorks to **ChatGPT on the web** (`chatgpt.com`) so ChatGPT can use your GooseWorks tools — files, chat history, automations, and the full [Ad Remixer](/ad-remixer/mcp) — directly in your chats, in your own account and billed to your own credits.
This is the **same** `gooseworks` MCP server documented in [MCP Servers](/concepts/mcp-servers) and [Ad Remixer MCP](/ad-remixer/mcp). On the web, ChatGPT connects over **OAuth** — you sign in with GooseWorks instead of pasting a token. (In clients that offer a token field — Claude Code, Cursor, Codex — you paste a `Bearer` token instead; see [ChatGPT work](/connections/chatgpt-work) and [MCP Servers](/concepts/mcp-servers).)
## Before you start
* Custom MCP connectors on the web require **Developer mode**, available on **Plus, Pro, Business, Enterprise, and Edu** plans. It's a **web-only** feature — not the ChatGPT mobile or desktop apps.
* Developer mode lets you add unverified connectors and carries an **elevated-risk** warning from OpenAI. See OpenAI's [Developer mode & MCP apps guide](https://help.openai.com/en/articles/12584461-developer-mode-and-mcp-apps-in-chatgpt) and the [Developer mode reference](https://developers.openai.com/api/docs/guides/developer-mode) before enabling it.
## Connect
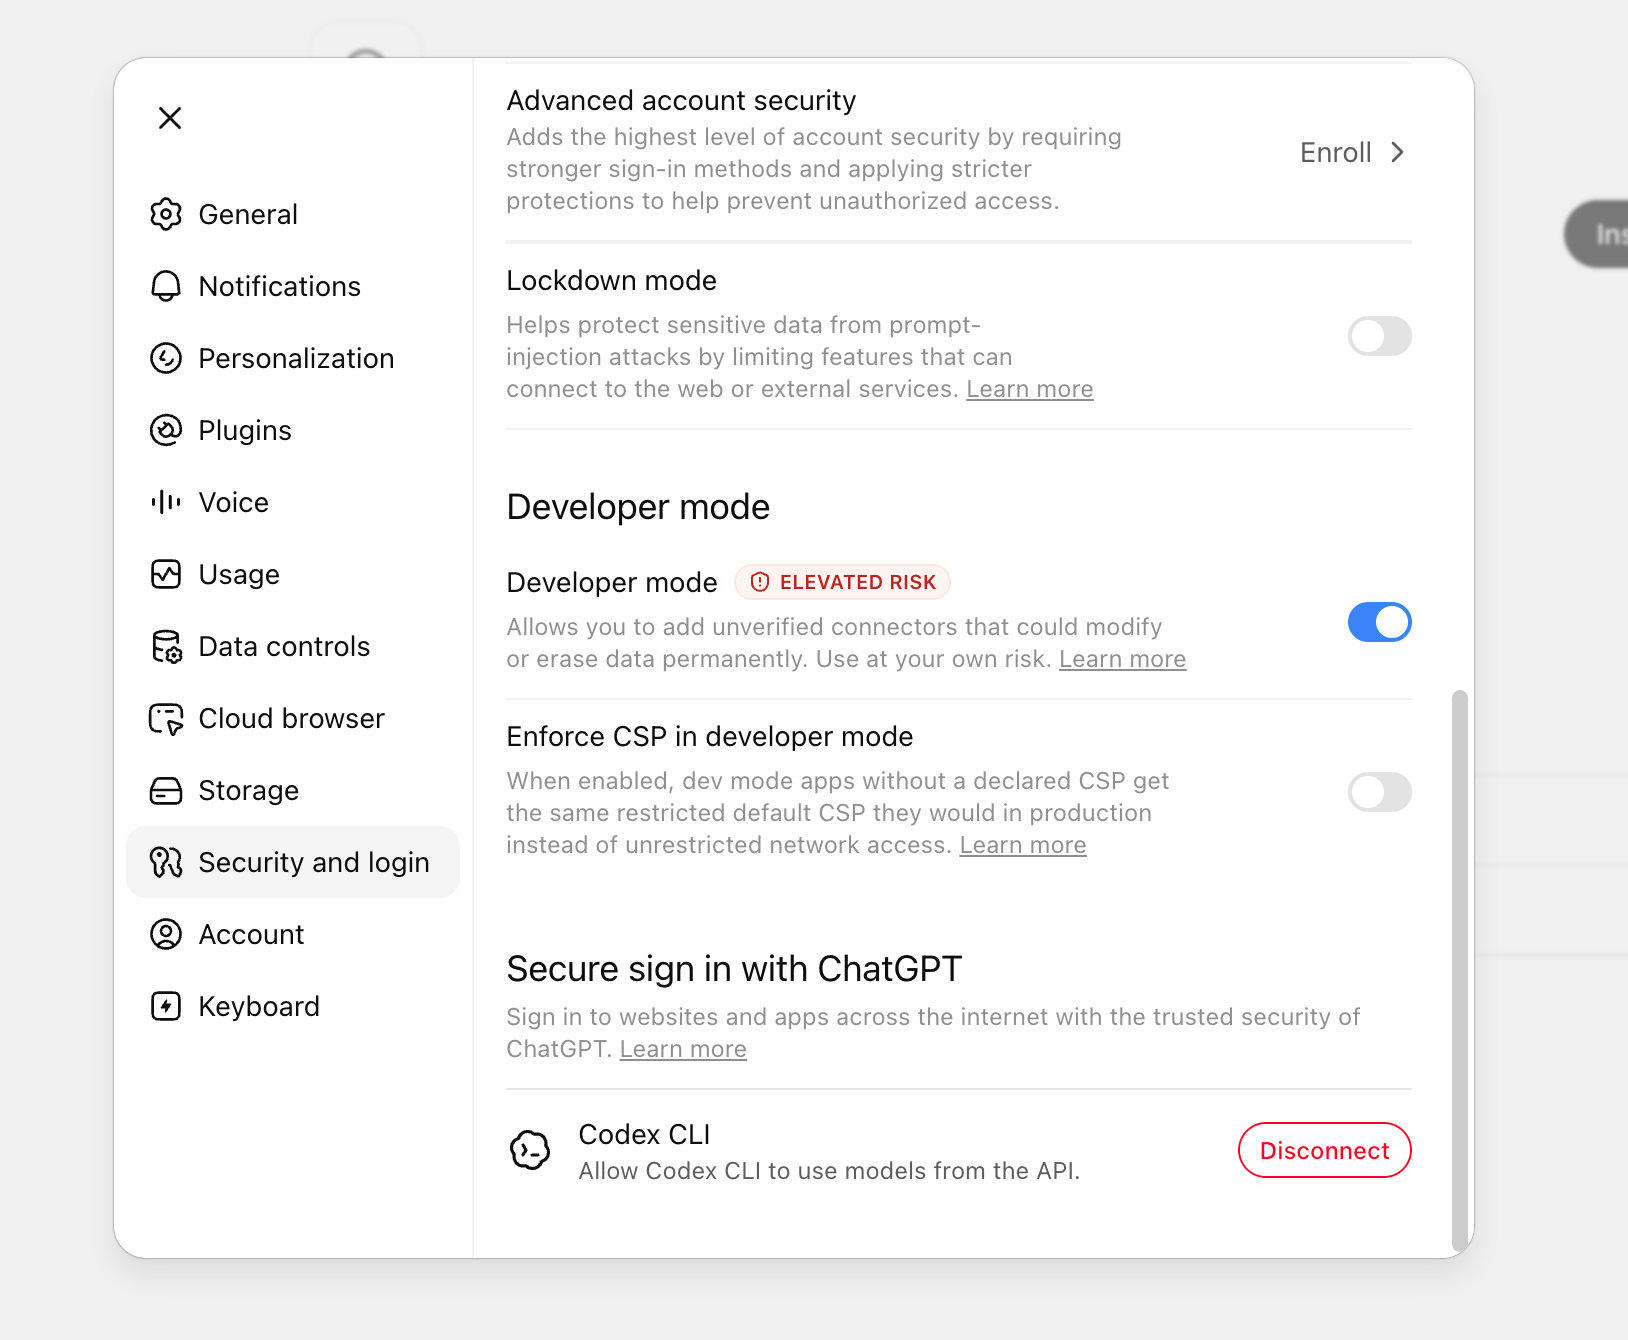
In ChatGPT, open **Settings → Security and login**, scroll to **Developer mode**, and turn it on. It's flagged **Elevated risk** because it lets you add connectors OpenAI hasn't reviewed — only add servers you trust (like GooseWorks).
Jump straight to settings by opening [`https://chatgpt.com/#settings`](https://chatgpt.com/#settings) in your browser.
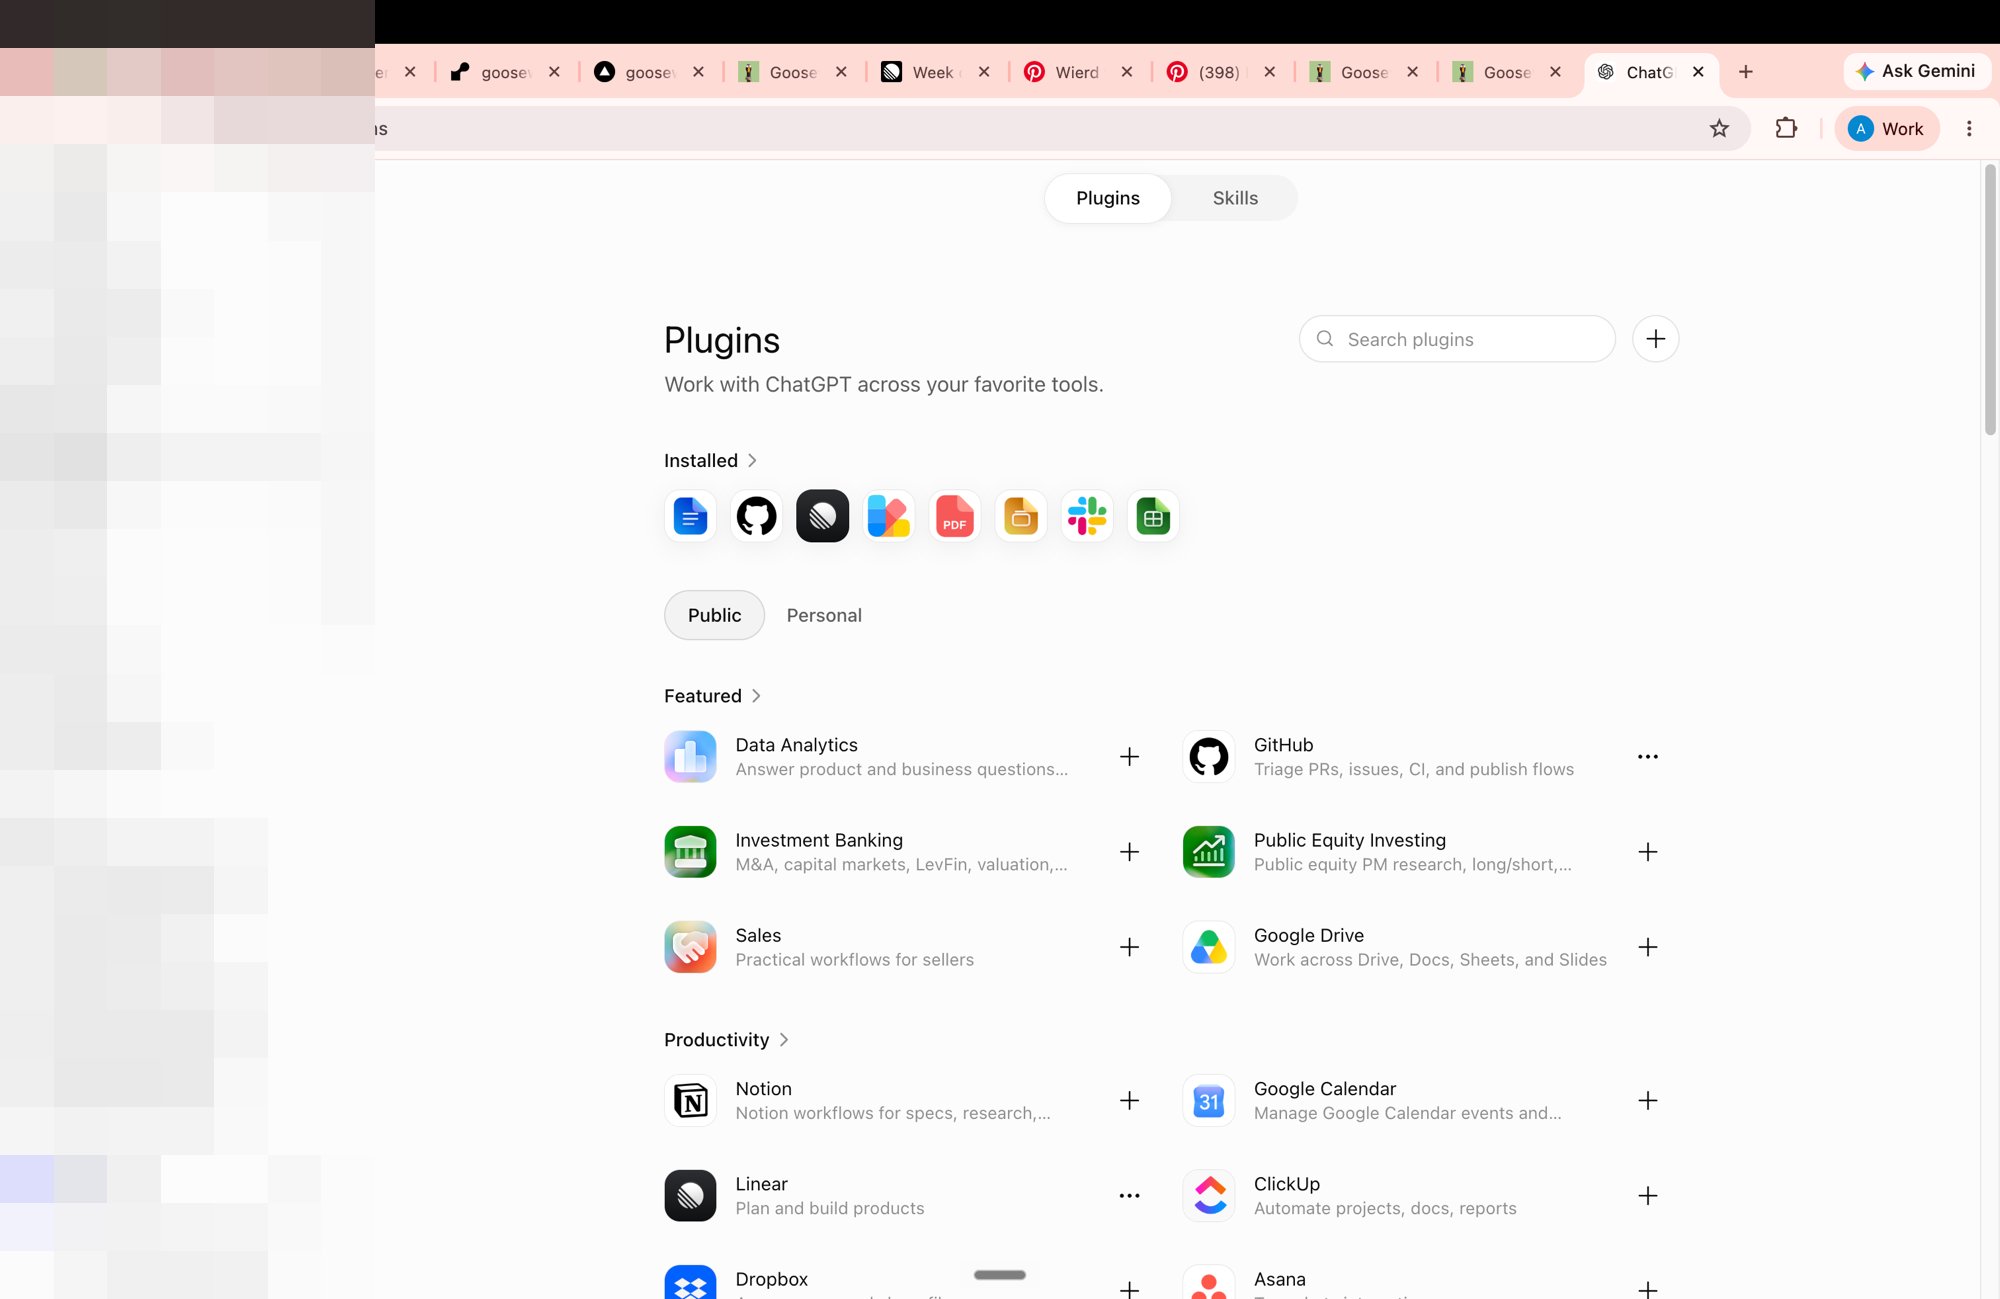
 Go to **Plugins** (or visit `chatgpt.com/plugins`) and click the **+** button in the top right.
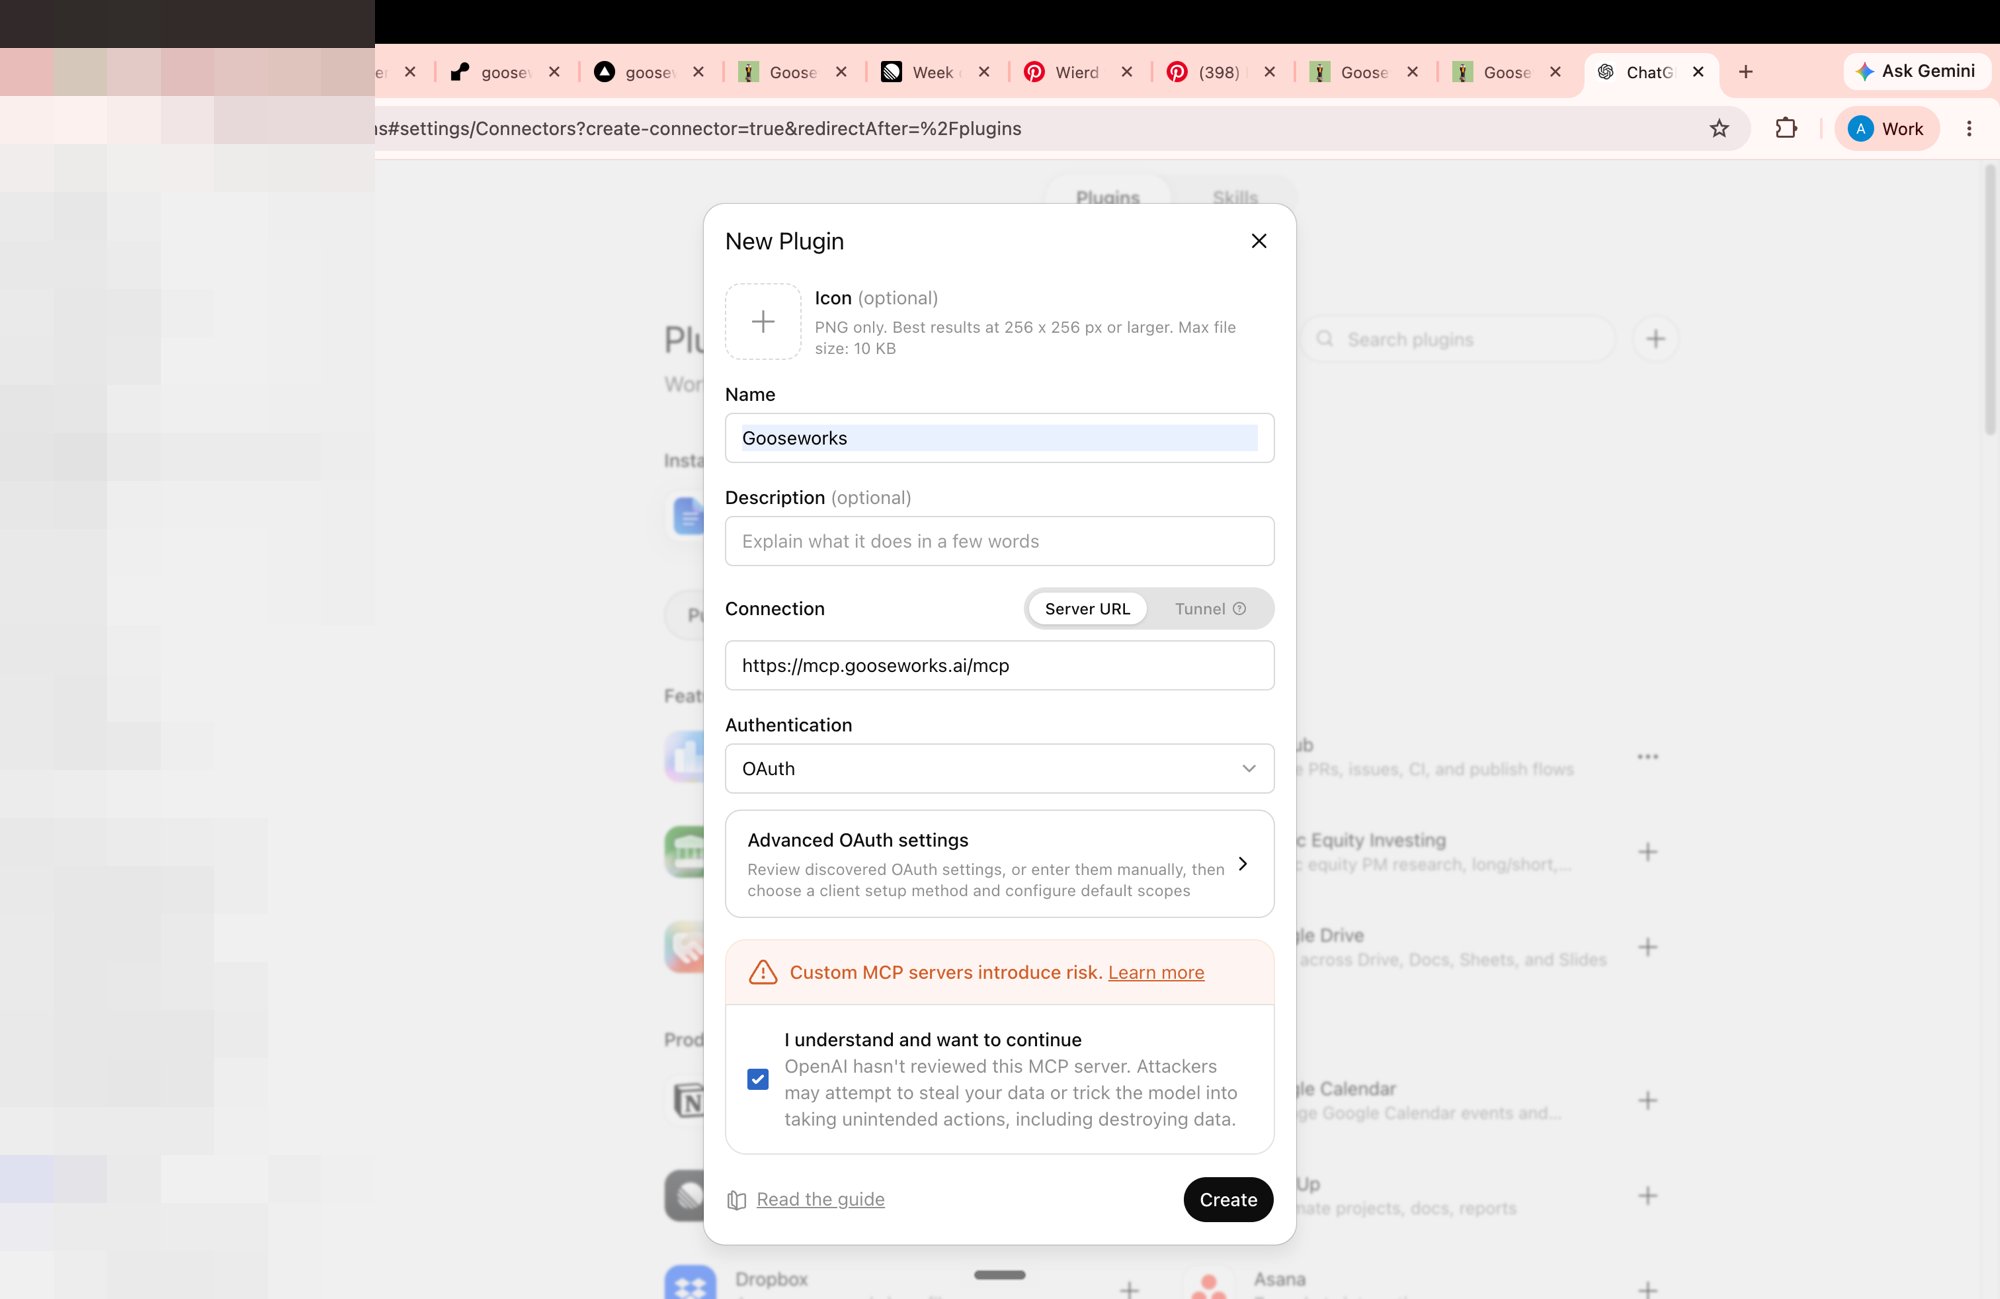
 In the **New Plugin** dialog:
* **Name:** `Gooseworks`
* **Connection:** **Server URL**
* **URL:**
```
https://mcp.gooseworks.ai/mcp
```
* **Authentication:** **OAuth**
Tick **I understand and want to continue**, then click **Create**. You can leave **Advanced OAuth settings** untouched — GooseWorks publishes its OAuth metadata, so ChatGPT discovers everything automatically.
In the **New Plugin** dialog:
* **Name:** `Gooseworks`
* **Connection:** **Server URL**
* **URL:**
```
https://mcp.gooseworks.ai/mcp
```
* **Authentication:** **OAuth**
Tick **I understand and want to continue**, then click **Create**. You can leave **Advanced OAuth settings** untouched — GooseWorks publishes its OAuth metadata, so ChatGPT discovers everything automatically.
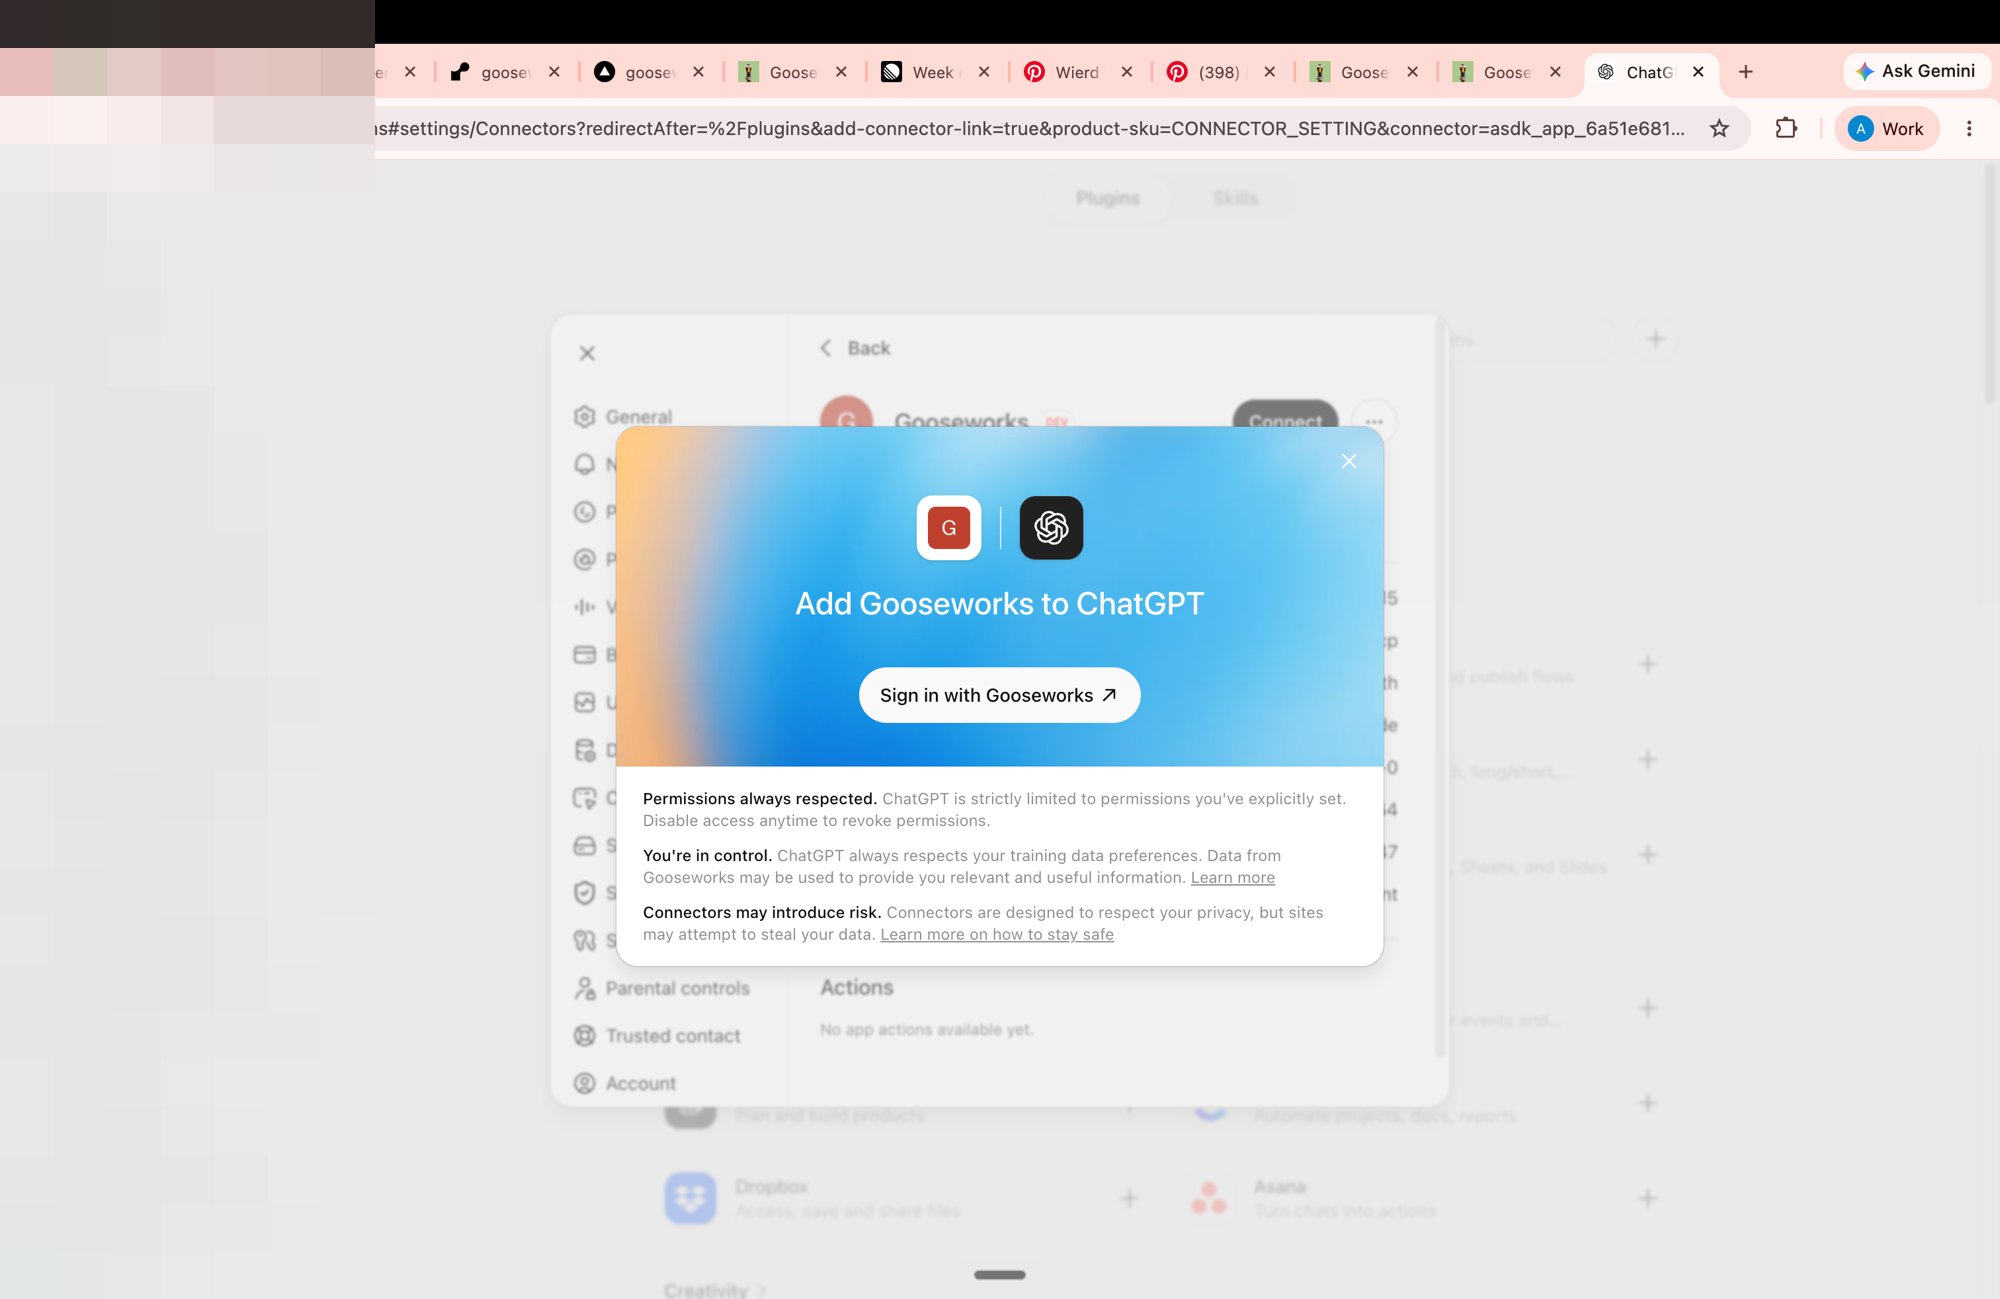
 Click **Sign in with Gooseworks** to start the OAuth flow.
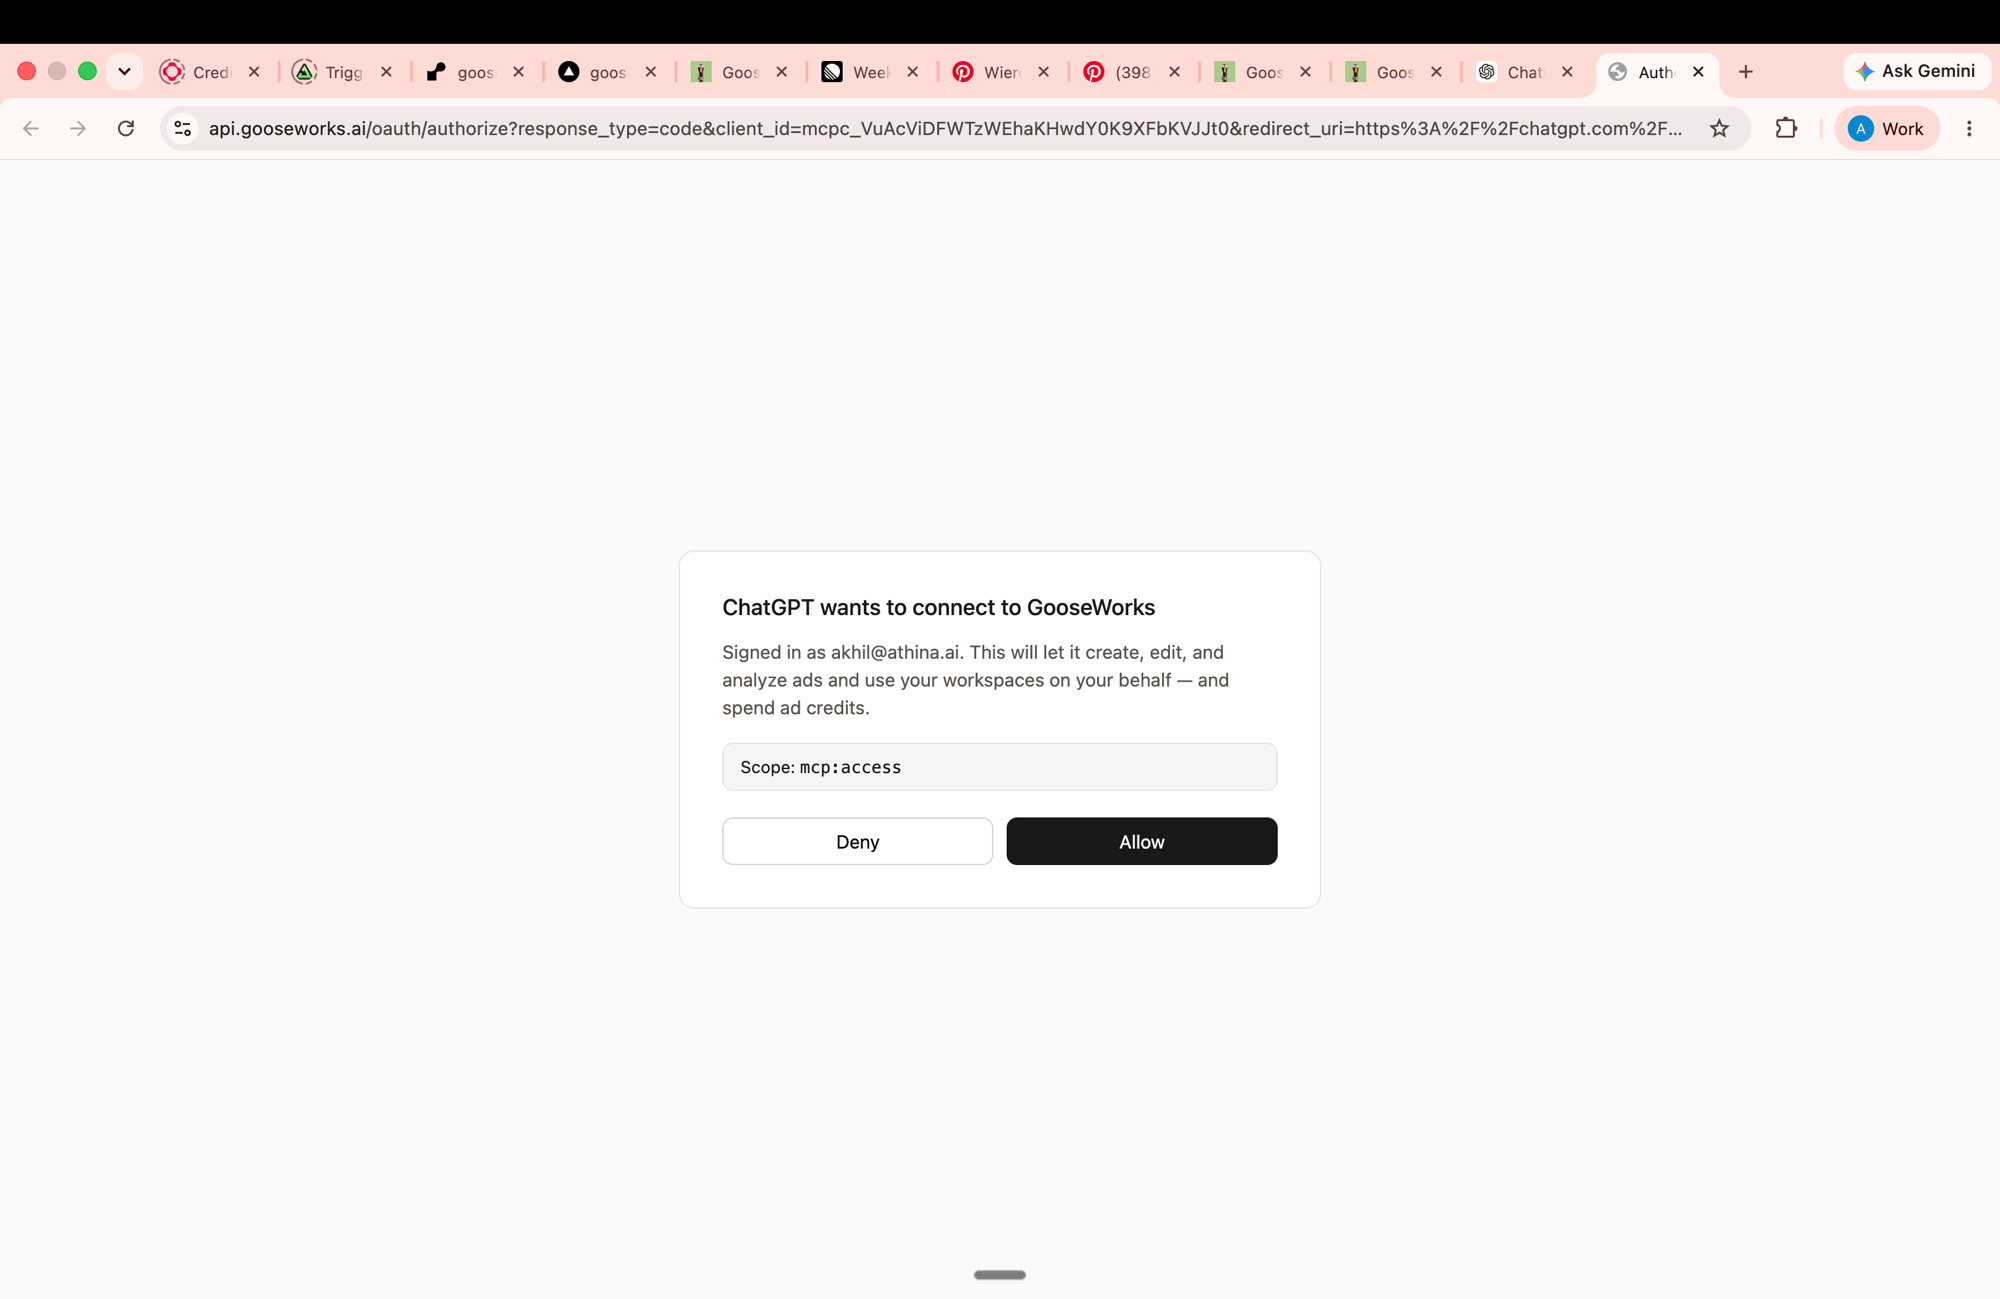
 You're taken to GooseWorks and signed in with your account. Review the access request (create/edit/analyze ads, use your workspaces, spend ad credits — scope `mcp:access`) and click **Allow**.
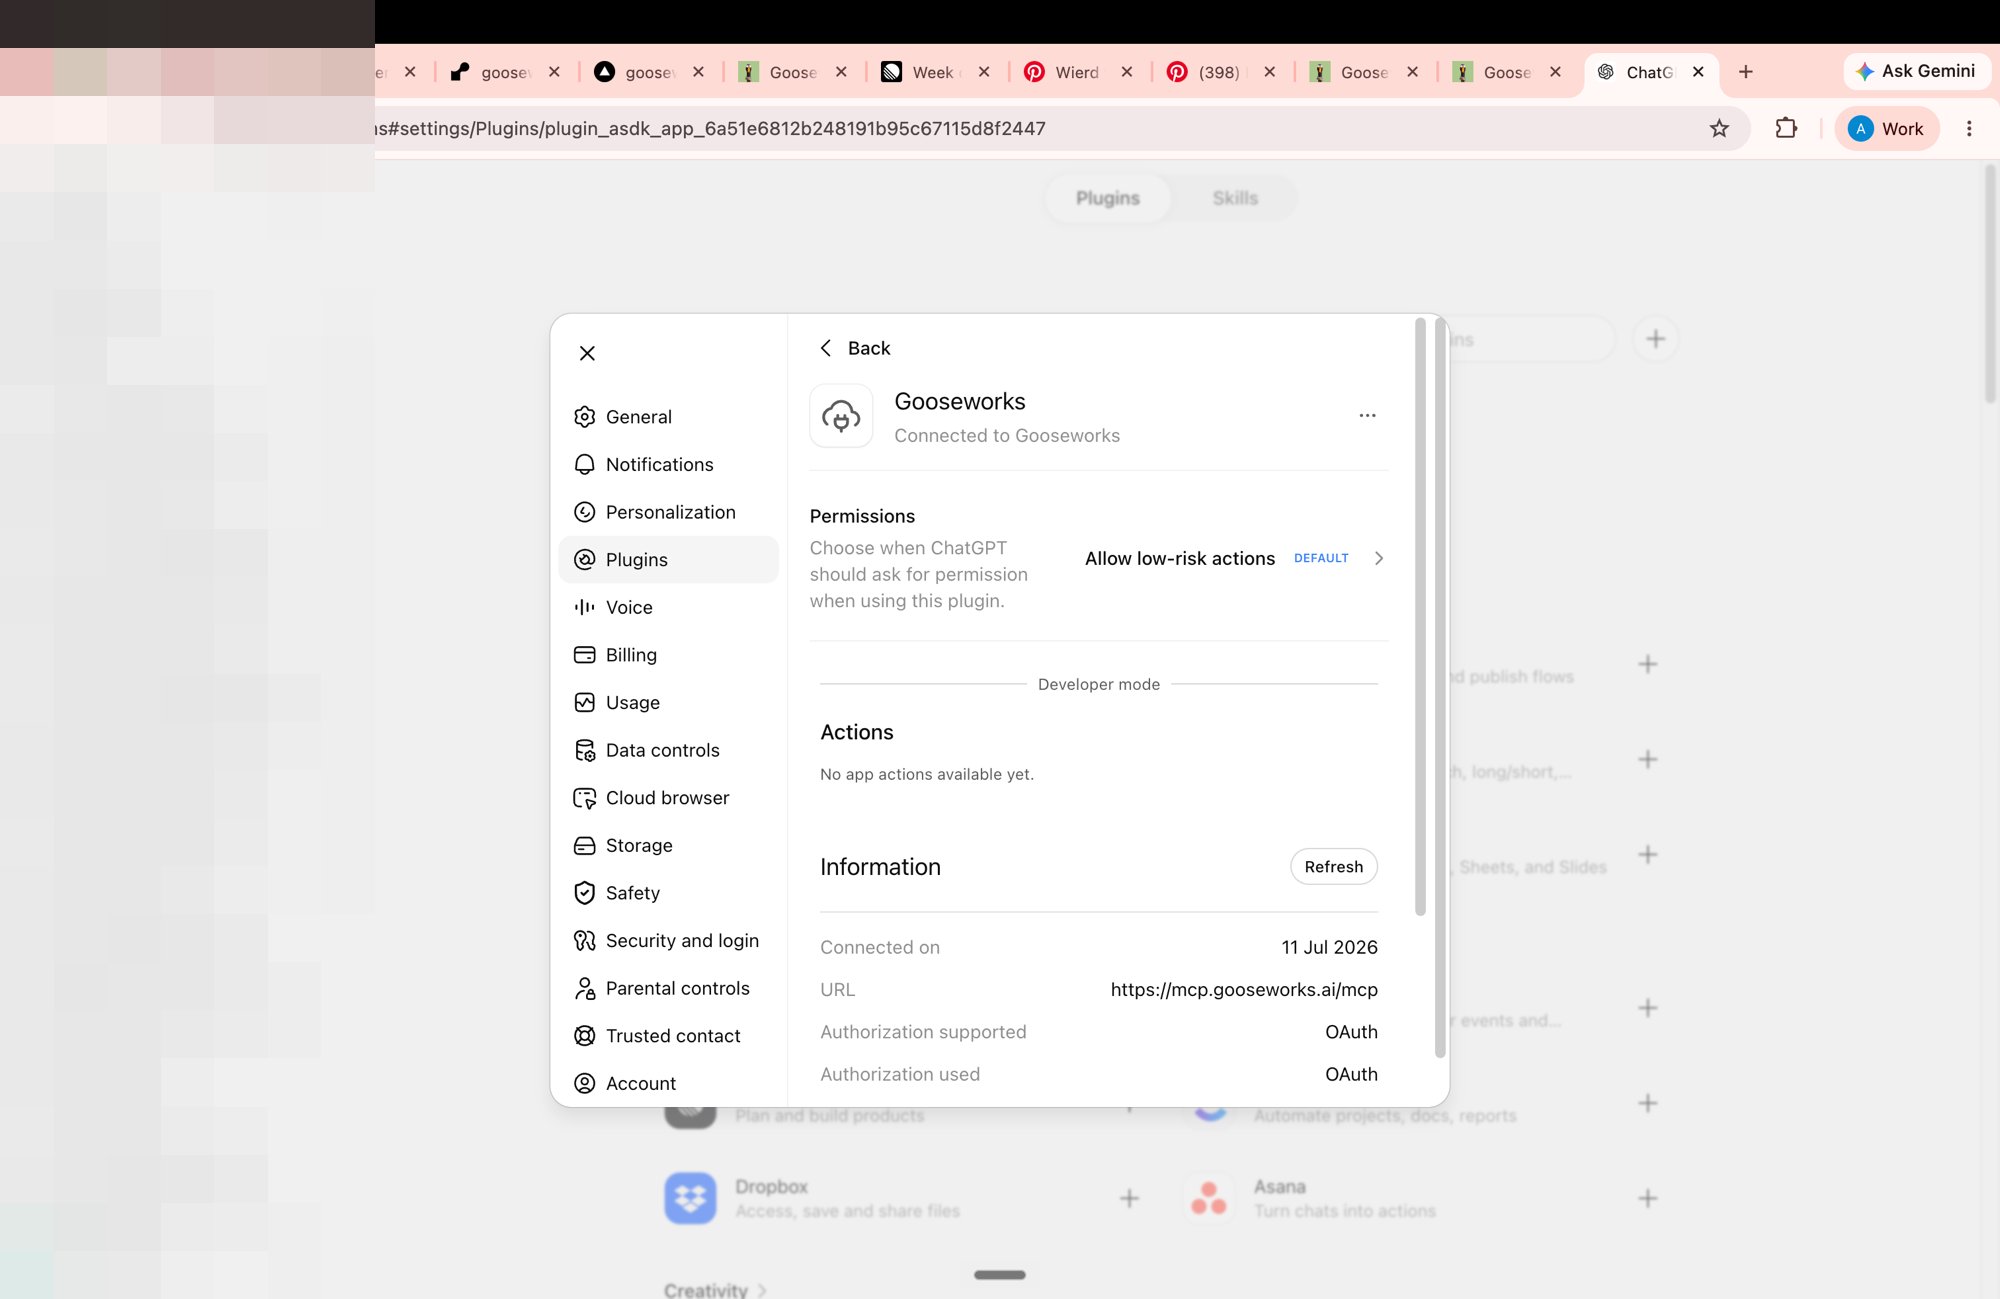
 Back in ChatGPT, GooseWorks shows as **Connected** under **Plugins**, with **Authorization used: OAuth**. The GooseWorks tools are now available in your chats.
 That's it — there's no token to copy. Signing in again supersedes the previous connection, so you never accumulate stale access.
## What you can do
Once connected, ChatGPT can, on your behalf and in your account:
* **Make, edit & analyze ads** — research a brand, remix templates into branded creatives, re-roll and edit them, and diagnose campaign performance. Generation runs through the same cloud workflow as the [web app](/ad-remixer/overview) — billed to your credits.
* **Work with your files, chat history & automations** — the standard [MCP Servers](/concepts/mcp-servers) tools.
* **Discover & load skills** — ask ChatGPT to find and use any GooseWorks skill.
## Managing the connection
* **Permissions** — set when ChatGPT asks before running an action under **Plugins → Gooseworks → Permissions** (default: "Allow low-risk actions"). Write actions ask for confirmation.
* **Access** — the connector is granted `mcp:access` for your account. It can use the GooseWorks tools and spend ad credits; it cannot change your account settings.
* **Refresh tools** — after we ship new tools, open **Plugins → Gooseworks → Refresh** to pull the latest tool list and instructions.
* **Disconnect** — remove the connector under **Plugins → Gooseworks** at any time.
## Troubleshooting
* **No "Developer mode" under Security and login** — you're on a plan that doesn't include it, or (on Team/Business/Enterprise) an admin hasn't allowed it. Developer mode is web-only.
* **"Couldn't connect" on the first try** — retry. The first request can occasionally time out; a second attempt connects.
* **Sign-in loops or "access denied"** — make sure you're signing in with the account tied to your GooseWorks workspace, and that pop-ups aren't blocked.
## Other clients
* **ChatGPT work, Claude Code, Cursor, Codex** — paste a `Bearer` token instead of OAuth; see [ChatGPT work](/connections/chatgpt-work) and [MCP Servers](/concepts/mcp-servers).
* **Claude** (claude.ai and Cowork) — also sign-in (OAuth); see [Claude](/connections/claude).
It's the same server and the same account either way.
That's it — there's no token to copy. Signing in again supersedes the previous connection, so you never accumulate stale access.
## What you can do
Once connected, ChatGPT can, on your behalf and in your account:
* **Make, edit & analyze ads** — research a brand, remix templates into branded creatives, re-roll and edit them, and diagnose campaign performance. Generation runs through the same cloud workflow as the [web app](/ad-remixer/overview) — billed to your credits.
* **Work with your files, chat history & automations** — the standard [MCP Servers](/concepts/mcp-servers) tools.
* **Discover & load skills** — ask ChatGPT to find and use any GooseWorks skill.
## Managing the connection
* **Permissions** — set when ChatGPT asks before running an action under **Plugins → Gooseworks → Permissions** (default: "Allow low-risk actions"). Write actions ask for confirmation.
* **Access** — the connector is granted `mcp:access` for your account. It can use the GooseWorks tools and spend ad credits; it cannot change your account settings.
* **Refresh tools** — after we ship new tools, open **Plugins → Gooseworks → Refresh** to pull the latest tool list and instructions.
* **Disconnect** — remove the connector under **Plugins → Gooseworks** at any time.
## Troubleshooting
* **No "Developer mode" under Security and login** — you're on a plan that doesn't include it, or (on Team/Business/Enterprise) an admin hasn't allowed it. Developer mode is web-only.
* **"Couldn't connect" on the first try** — retry. The first request can occasionally time out; a second attempt connects.
* **Sign-in loops or "access denied"** — make sure you're signing in with the account tied to your GooseWorks workspace, and that pop-ups aren't blocked.
## Other clients
* **ChatGPT work, Claude Code, Cursor, Codex** — paste a `Bearer` token instead of OAuth; see [ChatGPT work](/connections/chatgpt-work) and [MCP Servers](/concepts/mcp-servers).
* **Claude** (claude.ai and Cowork) — also sign-in (OAuth); see [Claude](/connections/claude).
It's the same server and the same account either way.